

Forging a Knife, Step by Step: From Bar Stock to Blade
Forge in sequence: set the point on full-thickness stock first, forge the profile, set the shoulders and draw the tang, then forge bevels last - blade tilted 10-12 degrees, overlapping blows from ricasso to tip, stopping at a dime-thick edge. Work at bright orange, never hammer below dull red, then normalize with three descending cycles before heat treat.
Forging a knife is not sculpting with sparks — it’s a sequence, and once you know the sequence, every session has a plan. This guide walks a first forged blade from bar stock to ready-for-heat-treat: a simple 3–4″ drop point from 1084, the steel every smith recommends for exactly this (see why). Gear assumed: the forge and anvil/hammer/tongs from the setup guides.
Reading Heat: Your Real Instrument
Work steel at bright orange to yellow-orange. Stop hammering at dull red. Steel moves easily at forging heat and tears/cracks when hammered too cold — more first blades die from cold hammering than any other sin. Dim your shop so colors read true, take more heats rather than stretching each one, and remember the forge does the work of softening; the hammer only redirects.
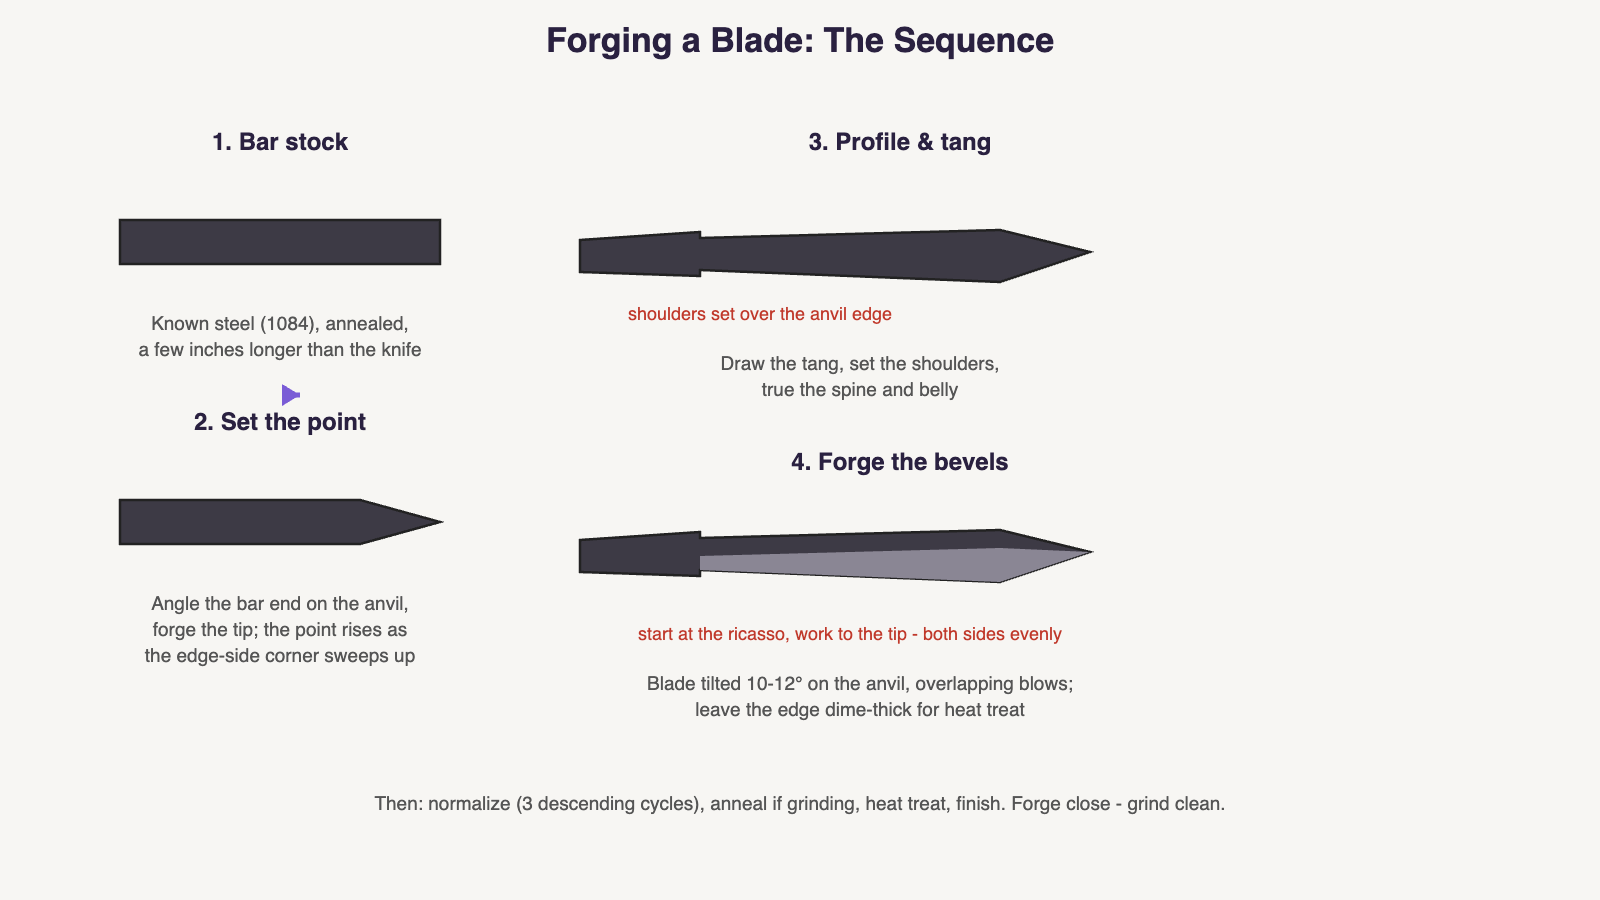
The Sequence
- Set the point first. At the bar’s end, angle the stock on the anvil face and forge the tip’s underside — the point forms as the edge-side corner sweeps up to meet the spine line. Working the point on full-thickness stock is far easier than on a thinned blade, which is why it comes first.
- Forge the profile. Looking at the blade’s silhouette: true the spine, sweep the belly, straighten wobbles. Frequent light corrections at heat beat heroic fixes later. Check against your drawing (a template taped to the quench tank is the cheap trick that keeps a first blade on-model).
- Set the shoulders and draw the tang. Hang the blank over the anvil’s edge at the ricasso line and strike to set crisp shoulders, then draw the tang out behind them — it thins and lengthens fast (tapering it also balances the knife). Full-tang builds can skip the heavy draw and keep the tang wide for scales.
- Forge the bevels — last. Tilt the blade 10–12° on the anvil (a wrist twist, not a big lean) and run firm overlapping blows from ricasso toward tip, flipping every few blows to keep both sides even. The blade will try to curve upward as the edge stretches — that’s physics, not failure, and the bevel guide covers the counter-bend that prevents it. Stop at a dime-thick edge (~0.030″): thin edges crack in the quench.
- Normalize before anything else. Forging heat grows grain and banks stress; three descending thermal cycles reset the steel (full walkthrough: normalizing guide). This step is the difference between a forged blade and a good forged blade.
- Grind, heat treat, finish. “Forge close, grind clean”: scale and hammer texture come off at the grinder or with files (hand-tool route works too — a white-vinegar overnight soak softens scale for file work). Then it’s the normal path: heat treat (1084 = very doable without a kiln), sharpen, handle.
First-Blade Realism
Expect the first one to be thicker than planned, slightly wandery in profile, and absolutely thrilling. Forge close, not perfect — leave yourself grinding stock (forged surfaces also lose a little carbon to the fire; grinding past that decarb layer is part of the plan, covered in the normalizing guide). Blade three will look like you meant it. And if the forging bug bites hard, the damascus section is where these same skills — heat control, hammer accuracy, patience — go to graduate school.
Sources
- The Crucible — How to Forge a Knife
- BLADE Magazine — forge beveling and blade tipping
- American Bladesmith Society — forging techniques forum
Common Mistakes
Hammering steel that’s dropped below dull red. Forging bevels before the profile (then chasing a warping shape). Thinning the edge past dime-thick and cracking it in the quench. Skipping normalizing. Forging to ‘final’ dimensions with no grinding stock left for scale and decarb.
Safety
Hot steel looks exactly like cold steel – treat every bar in the shop as hot, and pass nothing hand to hand. Scale flakes off glowing at hammer blows: eye protection always, natural-fiber clothing, boots scale can’t fall into. Keep the walkway between forge and anvil clear, and hearing protection on – anvils ring.