

Twist Pattern Damascus: Step by Step
Twist damascus is made by drawing a welded billet into a long square bar, heating it to a bright even red-orange, and twisting it with a vise and wrench - counting rotations for evenness - then gently re-squaring at welding heat and grinding in. Shallow grinding shows rope; deeper grinding reveals chevrons and starbursts.
Twist damascus is the pattern that looks like it required a wizard and turns out to require a pipe wrench. Twist the layered bar while it’s hot, grind it back flat, and the layers — now spiraling through the bar like a barber pole — surface as flowing rope, chevrons, and starbursts. It’s also the most forgiving pattern for makers without a press, because the twisting itself does most of the visual work.
Start from a solid billet (first billet guide). Twist rewards moderate layer counts — around 50–120 — since ultra-fine layers blur together once twisted.
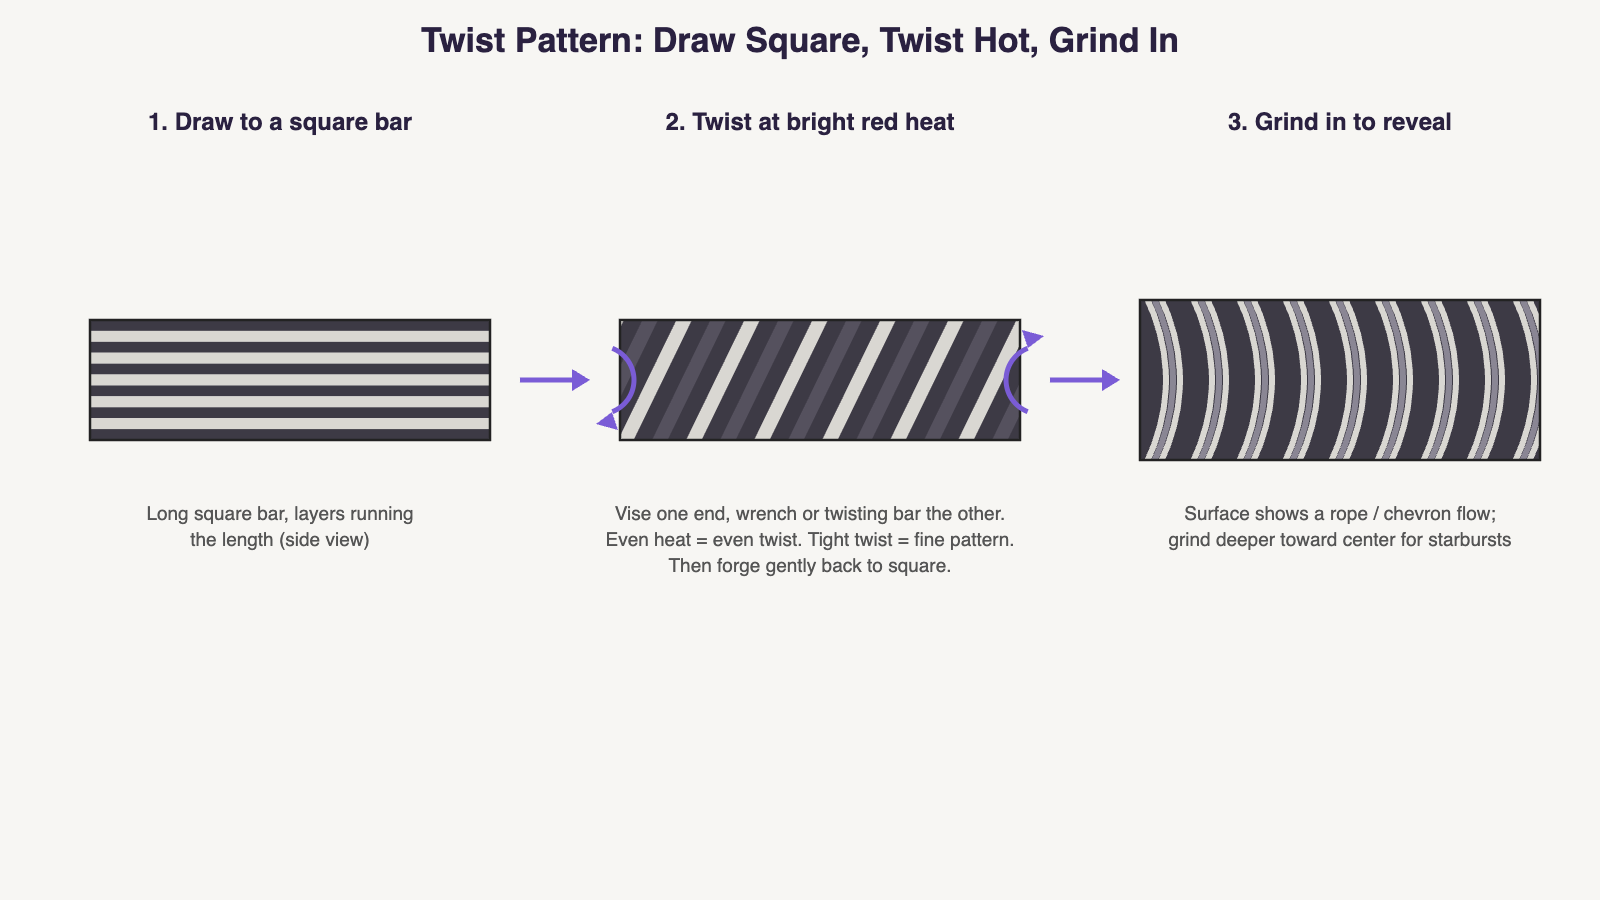
Step by Step
- Draw the billet into a long square bar, oversized in cross-section — twisting and re-truing eats dimension, so leave yourself margin (a 1″ square bar twisted hard can finish well under 7/8″). Keep it square and straight; a wandering bar twists unevenly.
- Knock the corners off slightly. A quick chamfer pass on the four corners at the anvil. Sharp corners fold over during twisting and trap crud against the bar — the classic source of twist-damascus cold shuts.
- Heat the twist zone to a bright, even heat. Bright red minimum, orange better, and even — the bar twists most where it’s hottest, so an uneven heat gives three tight rotations at the hot spot and nothing elsewhere. Work in sections if your forge is short: twist a section, move, match the count.
- Clamp one end in the vise, twist the other. Pipe wrench, adjustable wrench, or a purpose-made twisting bar. Twist smoothly and count your rotations so the pattern is even end to end (and reproducible next time). Direction is a style choice — just keep it consistent within the bar. Tight twist = fine, busy rope; a lazy half-turn per inch = broad sweeping lines.
- Do not twist cold steel. If the bar drops below red and you keep cranking, layers tear and welds open. Reheat as many times as it takes — patience is cheaper than a delaminated bar.
- Take a welding-heat pass after twisting. Bring the twisted bar back to welding heat and forge it gently back to square/rectangular with light blows. This re-sets any weld seams the twisting stressed and trues the bar for grinding. Skipping this is how twist bars delaminate at heat treat.
- Grind in to reveal. Here’s the magic of twist: depth changes the pattern. The bar’s surface shows a simple diagonal rope. Grind deeper and the spiraling layers open into nested chevrons; approach the center-line of the bar and starbursts bloom. Flat-grinding a blade from a twisted bar automatically gives you the full progression — rope at the spine, stars toward the center. Then heat treat and etch.
Level Up: Multi-Bar Twists
The advanced move: twist two or four bars — half clockwise, half counterclockwise — then weld them side by side and forge the composite into a blade. Opposing twists meeting at the centerline read as herringbone or a flowing W down the blade; it’s the foundation of the classic “turkish twist.” File it under “after your fifth successful twist bar,” not your first. The same billet skills also set you up for the feather pattern — a different advanced split-and-reweld trick.
Sources
- American Bladesmith Society forum — Damascus Twist Pattern
- BLADE Magazine — How to Create Damascus Patterns
- KnifeDogs — twisted damascus discussion
Common Mistakes
Twisting below red heat and tearing the welds. Uneven heat concentrating all the twist in one hot section. Leaving sharp corners that fold into cold shuts. Skipping the welding-heat re-set pass after twisting. Grinding only the surface and wondering where the starbursts are.
Safety
A bar under torque stores real energy – keep a solid grip and stance in case the steel tears or the wrench slips, and never put your face over the twist zone. Vise must be anchored to something that won’t move. All normal forge-welding PPE applies.